AD Banner

Featured

3/featured/recent

footer about

Videos

6/cate2/videos
Adv (300 x 250)

Find us on Facebook

5/cate3/lifestyle

Advertisement

6/breakingnews/random

Instagram posts

About us

3/cate1/entertainment

Recent Comments

Lorem Ipsum is simply dummy text of the printing and typesetting industry. Lorem Ipsum has been the industry's standard dummy text ever since the 1500s, when an unknown printer took a galley of type and scrambled it to make a type specimen book.
Copyright ©2019 by Mogtemplates

contact form

Name

Email *

Message *

Other News

[Related][recentmag]

EHI ONLINE LESSONS

EHI ONLINE LESSONS

Powered by Blogger.

Random Posts

World News

[World News][recentmag]
featured

Header Ads

Total Pageviews

Search This Blog

Blog Archive

Search This Blog

Latest

Brexit

Brexit

Football

Football

Random posts

5/cate4/random

Random Post

Adv (880 x 120)

News By Picture

pictures

Hot News

5/cate3/hottrend
Adv (880 x 120)

Labels

Hot News

[Hot News][recentmag]

Labels Cloud

Get In Touch
Footer Logo

Trending Posts Display

Labels List

Home Layout Display

Posts Title Display

Theme Layout

Theme Translation

Tech

tech

Games

games

Popular Posts

127 Likes
3,240 Followers
12.7k Subscribers
136 Followers

Pages

Recent Comments

How accessories make you a better lover. 18 ways devices are completely overrated. Operating systems in 12 easy steps.

Recent Posts

Adv (300 x 250)

Popular Posts

Trending Posts

Browsing "Older Posts"

11 Best WordPress Security Plugins to Safeguard your Blog from Hackers

WordPress Security PluginsHow secured is your WordPress blog? Have you ever given some thought? If No, you should start thinking about the security of your WordPress blog, now on.
Merely setting a strong alpha-numeric password with special characters and thinking ‘ I am safe now ’ is definitely a false sense of security. And, may cost you very heavily in the future. Security threats are too vast, ranges from a poorly coded plugin and theme to your WHOIS information and browser.
One thing is clear, your WordPress blog security is not an One-time-deal. Security is like a Lifetime commitment, just like a relation between Mother-and-Daughter!
A number of good quality WordPress security plugins are available, which can protect your blog from hackers. I am listing 11 best plugins for you to use on your WordPress blog.
Security Routine: You should invest at least 30 minutes, every week or fortnightly for scanning and different security measures.

Best WordPress Security Plugins

1. Bullet Proof Security: This plugin secures important files and protects against attacks including XSS, RFI, CRLF, CSRF, Base64, Code Injection and SQL Injection. One of the best security plugin.
2.WP Security Scan: It scans your WordPress blog for security threats and suggests corrective measures like – Passwords, File permissions, Database security, Version hiding, WordPress admin protection/security. Definitely, a complete WordPress Security Plugin.
3. Exploit Scanner: This plugin searches the files and database, including posts and comment system of your WordPress blog for any malicious threats
4. Ultimate Security Checker: It identify any security problem with your WordPress Installation. After complete scanning, it awards a security grade, based on how secured your WordPress blog is.
5. WP-DB-Backup: Regular (weekly or fortnightly) backing up your WordPress blog is a must from security point of view. It helps restoring your WordPress blog, once it is hacked. This WordPress plugin allows you to back up your core WordPress database.
6. Chap Secure Login: It secures your Pass Word, during login, on an insecure channel. Use a SHA-256 hash algorithm. An useful security plugin.
7. Restricted Site Access: It prevents visitors, who are logged in or accessing the blog from specific IP Address. It offers multiple options for handling blocked visitors.
8. Login Lock: It enforces you for a strong password policies. It also blocks hacker IP Addresses, monitors login attempts with an emergency lockdown feature.
9. Limit Login Attempts: It limits rate of login attempts, including by way of cookies, for each IP addresses.
10. One Time Password: This WordPress security plugin protects your blog in less trustworthy places like cyber cafes.
11.  Akismet: The ultimate spam fighter. When you label a queued comment on your dashboard as spam, Akismet block it’s origin forever. Its like contribution/fighting by the whole WordPress community against spam. Bad habit: Sometimes, instead of labeling a comment as spam, bloggers edit them and approve them as un-spam, knowingly, to show comments on blog posts. This way, you are promoting spam, nullifying the whole purpose of Akismet.
WordPress security is a never ending topic. We have discussed just the Plugins part. I will write a comprehensive article about WordPress Security in the coming days.
Apart from these 11 best WordPress security plugins, suggest your best pick in the comment section.

11 Best WordPress Security Plugins to Safeguard your Blog from Hackers

By Ehijoshua (Jboss) → Wednesday, 30 April 2014

Recharge Cards/Voucher Dealers In Nigeria (MTN, GLO, ZAIN,ETISALAT, STARCOMMS etc)

Baffled of where to buy bulk recharge PINS/vouchers of MTN, GLO, ZAIN,ETISALAT, STARCOMMS etc in Nigeria, at cheap rates?...Sit down and relax....

There are many dealers out there from which you can be buying your Recharge PINS of ALL networks. You are going to be dealing with these major dealers and NOT DIRECTLY with MTN, GLO, ZAIN etc UNLESS you too want to be a MAJOR DEALER.

Before going further, I hope you have read the articles below, if not kindly read them before you continue with this article.


So, let's ride on....

For those who are ready to go into the Recharge Voucher printing business and start making extra income with a start-up capital as low as N10, 000 or more, I have taken my time to compile a bumper package which will get you on the successful track instantly.

This package basically contains:

** A FREE SOFTWARE that you can use to start printing recharge Vouchers of all networks, though you still have to order for PINS.

** A simple to understand USER GUIDE with pictures on how to start printing recharge vouchers.

** Complete Infos of the Major Dealers In Nigeria from where you can be buying recharge PINs you will be printing on papers.

** Great Marketing ideas to help you succeed with this hot, lucrative business. This is the most challenging aspect of voucher business because, it is not the number of recharge vouchers that you can print in a day that matters but the number of vouchers you can sell on a daily basis.

This package also contains information on:

** The names of the dealers or companies you can choose from, their contact addresses, phone numbers and websites addresses of those that have websites(Not all these dealers have websites).

** The range of prices the different dealers are selling recharging PINS of all the different networks.

** The contact addresses of the dealers that require you to have access to computer and those that do not.

** How you can still patronize dealers that will require you to have access to computer without you needing to buy your own computer and subscribe for personal internet.

** How you can make your business name and address appear on each recharge voucher you print.

** How you can reprint a faded, skipped or any lost voucher during or after printing…..and MANY MORE.


(This is a snapshot of how the free software and its userguide will be attached to the Dealer's package that you will receive) 


The STEP BY STEP USER GUIDE, (including pictures) contained in this package, will guide you through printing your first batch of recharge vouchers. The guide is so easy to understand to the extent that a junior secondary school student you trust can be helping you with the printing of the vouchers when you are busy taking care of some other businesses. By the time you follow the simple steps in the guide, you will be able to print recharge vouchers similar to the one below:

By the time you digest the package and start the business, you will find out that within some weeks, you will be profitable and smiling to the bank. Besides, it is a skill that stays with you for the rest of your life. The package is like giving you the map to a goldmine and if you try as much as possible to get the package, am sure you will forever be grateful for the opportunity to discover the goldmine.

The package is NOT FREE OF CHARGE.

The package worth N5, 000 considering the fact that it is like giving you the secrets of printing money forever but I want to prove to you that I am not greedy but just want to help considering the current harsh economic situation of the country . So instead of selling at N5, 000 like my friends advised me to, which is still a good bargain considering thousands of Naira people keep paying at SEMINARS, I have decided to sell it low at N1, 000 to the first 100 serious Nigerians that order for the package. After selling to the serious 100 Nigerians, I will then increase the selling price of the package to N2, 500.

Now, that means there will be a rush for the package. With thousands of people coming from different search engines, forums, blogs etc; to read this free article in its first week of publication, I am sure all 100 spaces will get filled up within two weeks.

SO HURRY NOW AND MAKE YOUR ORDER. If banks could be interested in having a share of this lucrative business, SO WHAT ARE YOU WAITING FOR?


How DO I Pay?

To order, you have to pay N1000 to any of the accounts listed here .

After payment, you will have to send a text message to 07062918898 about your payment details and your email address where the package will be sent to. Once your payment is confirmed, you will get your package asap,delivered right into your inbox.

CAN'T MAKE IT TO THE BANK OR NOT CHANCED TO GO TO THE BANK,  text me and I will tell you the alternative way you can get the payment across to me..
TEXT07062918898
EMAIL: jide AT ogbongeblog.com


The first 100 Nigerians to place their order for the package will get a full resale right to sell the package which means they will get the rights to sell the package and keep the money to themselves 100%. That means if you buy the package for N1, 000 and sell it at the same price, you only need 500 sales and you would have made N500, 000. How easy it is to make money in Nigeria from Information Marketing.
No matter how worsen the economic crisis might be, people will continue to buy phones, buy recharge vouchers and make calls, so what are you waiting for to tap into this hot business.


Feel free to use the comment form below this post in asking me any question you might want to ask.


08077531917


Recharge Cards/Voucher Dealers In Nigeria (MTN, GLO, ZAIN,ETISALAT, STARCOMMS etc)

By Ehijoshua (Jboss) → Tuesday, 29 April 2014

Automatically Share Your Post To Twitter And Facebook

 
imagesAs a blogger we know that how important it is to promote our posts to social networking sites, because now Google is also considering social traffic in search engine ranking. If your post is widely shared among social sites and has got numerous likes and share, then it is a positive signal to Google to rank your post high in search engine.


 If your blog has high followers on different social sites and you are not able to share your posts to your followers (we know how tight your schedule is) and due to constrains of time, it could be tough and not possible to share your content with your follower, then you need not to worry anymore because today I am going to share how you can share your posts to Facebook And Twitter automatically.
Previously I have shared how you can post automatically to Facebook only but today in this tutorial you will be able to share to Facebook, Twitter as well as LinkedIn automatically.

This is possible from a best website called Tweetfeed where you have to only create and link your page and after that your posts will be automatically shared to Facebook And Twitter with the help of rss feed of your blog.

Here are the steps:


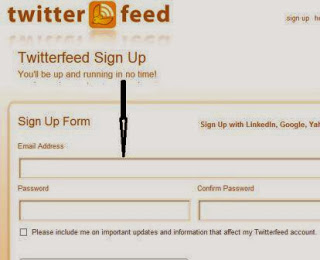
  • Firstly go to Tweetfeed and sign up by entering basic information like email, name etc.
tww
  • After sign uo go to homepage and add your blog name and enter your blog feed url.Make sure that your feed url is correct.Click next.

t2
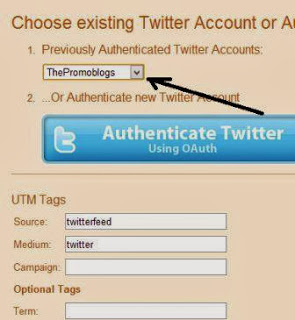
  • Choose account where you want to automatically share your posts.In my case I have selected twitter page.
  • Click on authenticate twitter which will lead you to twiiter sign in page.

3
  • After sign in it will automatically authenticate your page


tttt
  • After that a successful message will be shown.Click on done.

tttttttttttt

tttttttttttttttttt


  • After this your post will be automatically shared to your account whenever you posts new content on your blog.

Similarly you can easily configure for Facebook.
You can set either title or title and description both to share on twitter and Faceook.And best part is that you can set checking frequency.For example I have set 30min checking frequency ,by which it will ckeck automatically every 30min for your new posts.

Automatically Share Your Post To Twitter And Facebook

By Ehijoshua (Jboss) →

Robot.txt for Blog SEO: List of Generator and Checker tool

 
Robot.txt file is simply a line of codes that tells crawler what part of site to index and which not. As a blogger you should at least know the basic of Robot.txt file. Although it sounds more technical word but it is just as simple as publishing post. 

Untitled-1
In this tutorial I will be sharing about tools that will help you to easily create Robot.txt file and tools to check whether the file you created is right or not. Because just a line of wrong code can block your site from being index in Google which ultimately leads to no traffic.
You don't need to go into the technical aspects and meaning of each line and neither I am going to teach you, but I will be sharing simple meaning and a tool that makes it easy to handle all.

Advantage of using Robot.txt

As I said with Robot.txt file you can tell Google to not index certain URL or part of the website, therefore you can take advantage in many ways
  • For example there are many parts of blog like archive, labels, search pages which we usually don't like to display in search results. All these pages contains duplicate content in perspective of a crawler which in returns cause duplicate content issue and finally lower ranking.
  • You will get the notification for the same in webmasters tool. To fix that I already shared the ways previously.
Fix Duplicate Meta Description Error in Webmaster tool
How to Remove 404 Broken Links Errors
  • So by simply blocking all these type of pages in Robot.txt file you will save all these kind of issues.
  • Similarly on WordPress you can block wp-admin area from robots and similarly other directories.
  • Having a Robot.txt file gives you advantage of a better blog management in terms of seo and Google crawler love that too.

Disadvantages of Robot.txt

There are no disadvantages as such but wrong use of Robot.txt file could lead to serious problem in blog.
  • For example you could accidentally place a code that actually tells crawler to not index you blog.
  • Similarly you might end up yourself blocking important pages.
  • When I was newbie I also blocked my sitemap from Google crawler and that caused the problem of not indexing my further posts. But I figured out in webmasters tool and immediately fixed the problem.

But you don't need to worry if you make use of tools that I listed below. But using these tools you can check whether you have correctly placed the code or not.

According to google:
A robots.txt file restricts access to your site by search engine robots that crawl the web. These bots are automated, and before they access pages of a site, they check to see if a robots.txt file exists that prevents them from accessing certain pages.

How to see your robot.txt file

  • Enter following url in the address bar
http://www.yoursiteurl.com/robots.txt

  • Replace yoursiteurl with your own blog url

The simplest robots.txt file

  • User-agent: the robot the following rule applies to
  • Disallow: the URL you want to block
User-Agent: Googlebot
Disallow: /folder2/

Tools to create Robot.txt file:

These tools are simple to use and it makes all hectic of understanding Robot.txt file easiest. 

1. SEObook tool:


  • You just need to add the URL which you want to block and just hit enters. This tools will automatically add it to you file. After you complete just copy the code and paste it into your Robot.txt file. 
  • Finally use tools to check the correctness.
Robots.txt+Generator
Alternate tool

Add robot.txt to Blogger blog:


  • In blogger you can easily add Robot.txt code by going to settings>Search preferences.
Blogger++MyBlogPromo+Blogging+Around+++Search+preferences

Tools to check/Test Robot.txt file:

I strongly recommend you to use these tools after you added the code to your blog, because if something went wrong you would not be able to recognize the problem.

1. Using Google webmaster tool


  • Webmasters tool for Google is best for testing purposes and for that you can go to Crawl section of Webmaster Tools and then Blocked URLs 
  • Just copy the code from your blogger Robot.txt file and paste it in the box provided.


Webmaster+Tools+++Blocked+URLs+++http+++www.myblogpromo.com+


  • Now in the lower box enter your URL which you want to check and click test. 
Webmaster+Tools+++RLs+++http+++www.myblogpromo.com+

  • You will see a message showing the status if the URL is blocked by Robot.txt or not. It also shows the line which is allowing or blocking.


Remember adding code here in webmasters tool is just for testing purposes, it doesn't add Robot.txt file to you blog. For that you have to add the file in you blog only.


2. Frbee Robot.txt check
Robots.txt+Checker


Alternative:
  • www.robotstxt.org/checker.html‎
  • http://phpweby.com/services/robots
This was the simplest yet effective tutorial to understand and implementation of Robot.txt file in your blog. All the probloggers use Robot.txt for their blogs and you should too, but make sure you don't end up your blog harming firm it. That's why I have shared the testing tools as well. 
Do you have any questions? Did you placed wrong code in your Robot.txt file? Do you want to know what's the meaning of each line is? Please feel free to ask me in the comments below. I am always here to help you. Also share you experience of using Robot.txt file. Don't forget to like us in Facebook and Google plus.

Robot.txt for Blog SEO: List of Generator and Checker tool

By Ehijoshua (Jboss) →

Top 6 Blogging Communities to Get Huge Traffic


Capture
I have seen many newbie bloggers saying that they are not getting enough traffic although they are publishing so many articles. Why is so? Here comes the point which they are missing, the blog promotion, which is as much as important and must as creating content. For that there are many different ways to get your blog spread over blogosphere which every problogger talks about and Apart from the usual ways to promote your blog I had also shared some ways to get your blog promoted by unusual ways.


On the top list we talk about social media website like Facebook, Twitter and Google plus for promoting out blog content and that's also award us with some descent traffic only if we have a large fan base and that too targeted. And the second number that comes at the top list is blogging community.
Blogging community not only gives you the targeted traffic but it makes a little different from social media websites. Blogging community gives you great oppuritinuty to make connection with likeminded people, learning from fellow bloggers, asking for help and building high readership.

Benefits of using Blogging communities:

Blogging communities can benefit you in number of ways including commenting, asking questions in forums, promoting your articles, participating in conversation, appreciating others content and much more but in this list I am going to share only those blogging community which are top on the list and offers features which most of blogging communities doesn't provide. Here I am sharing some features which are unique about these communities.

Backlinks:

All the blogging community which are listed are high authority and high page rank and best part is they provide dofollow backlinks which is all we wants. Because Google will index your submitted link and passes the page rank juice to your blog which not only increases your page rank but also increase your search engine ranking.

Building relationship

With this blogging community you will be getting yourself into the ocean of people who thinks like you and there are almost all from problogger to beginner. You can ask problogger to help you or ask them to accept you to post guest post on their blog and also helps beginner who might get caught in simple perspective by mean of which you will be creating a community around you which not only helps you to increase your blog exposes but also a backup.Thus building relationship with blogger is one advantage of using blogging community.

List of 6 Blogging Communities to Get Huge Traffic:

Although all blogging community offers same feature but some of these gives unique features as well.
Not going into depth of features really and benefits I would come directly to the list of best blogging community which you should consider using. I would recommend you to at least use 3 blogging communities if you really wants to get something out of it.

Blogengage:

Blogengage is number one blogging community which almost every problogger uses. I have made a separate review of blogengage in which I have deeply shared its stunning features. Although it's premium blogging community but the spending one time money is really worth.
Page+Capture20140115_102258
I am a member of blogengage and the results we are getting are awesome. I would really recommend you to use and have a look at this platform.

Blokube:

This is another blogging community which I am using and Apart from giving dofollow backlinks, I really liked its simple feature and the way it works. Number of bloggers uses blokube and there are many features which really works when it comes to promote your blog. Unlike Blogengage, blokube is free to use and the registration process is really simple.
Page+Capture20140115_102601
Based upon the number of votes your ranking depends and if you create stunning and high quality content, you content get to position one.

Bizsugar:

Bizsugar is another blogging community which is mostly used by bloggers to promote their posts. When you sign up initially, you would need to go through sign up moderation process while submitting your first article, but after it approves you are free to submit and share infinite posts. This community is best if you want traffic to your blog because being huge number of users you would be getting enormous traffic.
Page+Capture20140115_102925

Inbound

Inbound is another great one in the list which has large number of active users. If you get high votes for your submitted article, you would easily get it to the home page and get features which in return reward to you with precious traffic to your blog. Participating in forum discussion, voting for others etc are few things which you would love to use and build connections around you.
Page+Capture20140115_103906

Klinkk:

Klinkk is another awesome community you would love to join as it has been continuously spreading and becoming popular among bloggers. Although it is quite same as the blogging community above but you can give it a try and add it to your list.
Page+Capture20140115_104502

Indiblogger: Indian Blogging Community:

Strictly for Indian bloggers, indiblogger is one of the top and best blogging communities which I strongly recommend. Similarly operated like other community, it does have some unique features which it makes different from others. Although it is free to join for everyone, but before submitting your first time post there, it need to pass through manual submission from administration. And after that you can only post the links from URL, for which you have been approved. Indiblogger is quite helpful to make friends and look for another blogger around your cities.
Page+Capture20140115_104833
  • Another great thing is their indirank, which is a ranking system to make a list of top blogs in India. Category wise they have a list of top bloggers and you can start following them right after the registration.

  • One great thing to mention is bloggers meet which they conduct quite often where all blogger from India get together and show their knowledge. Problogger as well newbie bloggers participate in these bloggers meet, which I found interesting day unique. They also have others lovely features which you would love. So if are blogger based in India, then I would strongly recommend you to use indiblogger.

Summing up:

So if you are one of blogger struggling to get traffic toyour blog, then go ahead and do some homework in blogging community, I bet you would get results straight from the day you enters in. But make sure to not get involved in spammers activities around, otherwise it will only harm you. Try to make connection in positive manners as its only thing which matters lot in blogging.

Please do share with us which of these communities you are looking forward to join and why? And also feel free to share your experience in past if any with any of these community? Although I have put my best to make the best list but if I forgot to mention any other top community which you think should have been added to this list, please share within the comments below. Don't forget to share with your friends on google plus if you liked the post.

Top 6 Blogging Communities to Get Huge Traffic

By Ehijoshua (Jboss) →

All Nigerian Internet Data Bundle Plans & Subscription Codes


This is a complete list of all internet data bundle plans provided by all Nigerian Internet Service providers with their prices and subscription/activation codes inclusive. It comes in handy if you do not know which network to choose from and which Internet bundle plan you would love to activate for your usage. This guides covers the various major network providers in Nigeria namely; MTN, Airtel, Glo and Etisalat. mtn etisalat airtel glo data plan Let’s start with MTN.

All Internet Data Bundle Plans for MTN Nigeria and their Subscription Codes

Plan NameService RentalBundle SizeValidity PeriodSMS CodeTarget Device
MTN Mobile DailyN10010MB24 hoursText 104 to 131Handset
MTN Daily InternetN500150MB24 hoursText 104 to 131Handset/PC/tablet
MTN  250MB Mobile BrowsingN1300250MB24/7- 30 daysText 109 to 131Handset/PC/tablet
MTN 500MB Mobile BrowsingN2,000500MB24/7- 30 daysText 110 to 131Handset/PC/tablet
MTN 1GB Mobile BrowsingN3,5001GB24/7- 30 daysText 111 to 131PC/tablet
MTN Monthly for MobileN1000100MB24/7- 30 daysText 106 to 131Handset
MTN Weekly for MobileN50025MB24/7- 7 daysText 105 to 131Handset
MTN Monthly InternetN80005GB24/7- 30 daysText 101 to 131PC/tablet
MTN Weekend InternetN30003GB9am Fri – 9pm Mon, 30 daysText 108 to 131Handset/PC/tablet
MTN Day Time InternetN6,0003GB9am – 9pm, 30 daysText 107 to 131Handset/PC/tablet
MTN Night InternetN2,5003GB9pm – 6am, 30 daysText 102 to 131PC/tablet
Below is also Other MTN Data Plans that are Time Based (It is known as the MTN Hourly Plans).
Time LimitAmountActivation CodeValidity Period
2 HoursN250Text 2H to 1312 Days
20 HoursN1500Text 20H to 1317 Days
100 HoursN5000Text 100H to 13130 Days
300 HoursN13000Text 300H to 13190 Days
To check your internet Data balance on any MTN Internet Bundle Plan, simply Text 2 to 131. Now, lets move over to the Airtel Network.

All Internet Data Bundle Plans for Airtel Nigeria and their Subscription Codes

Plan NameService RentalBundle SizeValidity PeriodUSSD CodeTarget Device
Airtel Daily Internet BrowsingN10010MB24 hours*141*712*11#Handset
Airtel Day Internet BrowsingN500150MB24 hours*141*712*3#Handset /PC /tablet
Airtel Weekly Internet BrowsingN40025MB24/7- 7 days*141*712*9#Handset
Airtel Weekend Internet BrowsingN3,0003GBweekends*141*712*8#Handset /PC /tablet
Airtel Lite Internet BundleN1,000200MB24/7- 30 days*141*712*4#Handset /PC /tablet
Airtel Night Internet BrowsingN2,5003GB30 dayS*141*712*7#PC/tablet
Airtel Plus Internet BrowsingN5,0003GB24/7- 30 days*141*712*1#Handset /PC/tablet
Airtel Max Internet BrowsingN80005GB24/7- 30 days*141*712*2#PC/tablet
Airtel Premium Internet BundleN15,00010GB24/7- 30 days*141*712*5#PC/tablet
Airtel Smartphone Internet BundleN3,0001GB24/7- 30 days*141*712*10#PC/tablet
Above are all the internet bundle plans offered by the Airtel Nigeria Network, to check your Data Bundle Plans on your Airtel SIM, simply dial *141*712*0#. Now straight down to the Glo Network.

All Internet Data Bundle Plans for Glo Nigeria and their Activation Codes

Plan NameService RentalBundle SizeValidity PeriodUSSD CodeSMS CodeTarget Device
Instant SurfN10010MB24 hours*127*51#Text 51 to 127Handset
One WeekN40050MB7 days*127*52#Text 52 to 127Handset/PC/tablets
Always MicroN1,000200MB30 days*127*53#Text 53 to 127Handset/PC/tablets
Always MacroN30001GB30 days*127*54#Text 54 to 127PC/tablets
Always MinN50003GB30 days
Text 11 to 127PC/tablets
Always MaxN75006GB30 days
Text 12 to 127PC/tablets
Always DayN500150MB24 hours*127*10#Text 10 to 127Handset/PC/tablets
Silver PlanN10,00010GB30 days*127*11#
PC/tablets
Gold PlanN15,00015GB30 days*127*12#
PC/tablets
PlatiniumN18,00020GB30 days*127*13#
PC/tablets
Glo G100N6,0003GB data limit100 hours
Text 20 to 127PC/tablets
Glo G300N15,0004GB data limit300 hours
Text 21 to 127PC/tablets
Glo G WorkN6,0003GB data limit8am – 9pm
Text 31 to 127PC/tablets
Glo G LeisureN5,0003GB data limit8pm – 9am + all day weekend
Text 30 to 127PC/tablets
These are all the codes for your internet data plans on the Glo network. To check you internet information, text info to 127.

All Internet Data Bundle Plans for Etisalat Nigeria and their Activation Codes

Below is a table that contains the etisalat plans and their subscription codes.
Plan NameService RentalBundle SizeValidity PeriodUSSD CodeTarget Device
Etisalat Daily Internet BundleN10010MB24 hours*229*3*1#Handset
Etisalat Weekly Internet Browsing BundleN50050MB7 days*229*3*4#Handset
Etisalat 200MB Internet Browsing BundleN1,000200MB30 days*229*2*1#
Etisalat 500MB Internet Browsing BundleN2,000500MB30 days*229*2*2#Handset /PC /tablet
Etisalat 1.5GB Internet Browsing BundleN4,0001.5GB30 days*229*2*4#Handset /PC /tablet
Etisalat 3GB Internet Browsing BundleN6,5003GB30 days)*229*2*3#Handset /PC /tablet
Etisalat 6GB Internet Browsing BundleN8,0006GB30 days*229*2*5#PC/tablet
Etisalat Night & Weekends BrowsingN4,000
30 days*229*3*3#Handset /PC /tablet
To check your data balance on your Etisalat SIM, dial*228# I hope you now can choose which particular network you wish to subscribe to their internet data bundle package. Feel free to add any code you think can be useful using the comment box below.

All Nigerian Internet Data Bundle Plans & Subscription Codes

By Ehijoshua (Jboss) →

How To Use MTN BIS On Android Smartphones


Hello friends, have you guys started to flex the new Airtel package as I posted about its release recently?
Today's post will be about BIS!
We all know for sure that data bundle costs more than BIS service which was created initially for blackberry
smartphone users.
However, in this post, I will teach you How To Use MTN Bis On Android Smartphones. Ain't that nice?
I know some people know this and are already using and enjoying its benefits but this is for the newbies
and not too tech savvy individuals to get the knowledge. So let's roll...

Benefits Of Using MTN Bis On Android Smartphones
 
1. It is cheaper
2. You have more data to Use
3. With more data, you can update your apps easily
So, How Do I Use MTN Bis On Android Smartphones
1. Go to network settings on your android device
2. Change the APN to blackberry. net
3. Then complete it with the normal mtn gprs settings
which are:
username: web
password: web
4. Then choose any desirable profile name maybe mtn
bis
5. Then save
That is all. Hope it helps.
If you need help,
suggestions, do not hesitate to Use the comment box

How To Use MTN BIS On Android Smartphones

By Ehijoshua (Jboss) →

4 Easy Steps to Start Building Your Mobile Website from Scratch

Mobile is more important than ever before. The sleek gadget has revolutionized our lives, to say the least. A few years back website owners were mostly uncertain when it came to the question of investing in developing a mobile-friendly version of their websites.
You would be surprised to know that today over 1.2 billion mobile phone users access the World Wide Web through their mobile devices. These alone is reason enough to get your website mobilized, or in other words, make your website mobile-friendly. Today your consumers are upwardly mobile. There is more probability for potential customers to view your website on their Smartphones and execute actions on the site.

Thus, it is vital for you to make your business website friendlier for the mobile audience. Here, I have summarized 4 easy steps to help you start building mobile websites from scratch.
mobile app development companies

Step 1 – Carry Out a Mobile web test of Your Website

The first step is to switch off the W-Fi connection on your mobile phone. This ensures that you’ll be using only your cell phone carrier’s own data network. Next, open your mobile web browser and punch in your site’s web address and begin counting. Note that if the home page loads in 5 or less than 5 seconds, then your site’s ‘load time’ is in a good state already. However, if your website takes more than 10 seconds to load fully, you need to make improvements to your site.


Also remember that if the home page of your website has a banner image, a large graphic, a Flash animation or an embedded video that loads on start, you need to change the layout, as such features are not mobile-friendly. Moreover, ask your friends to test the ‘load time’ from their cell phones and if possible using different mobile web browsers. Note down these observations and move on to the next step.

Step 2 – Make the Improvements One at a Time

Start with the user interface. Make sure that your website must have the following page elements clearly visible once anyone logs in from a mobile device. These are – your business name (brand name), a small description of your business (e.g. Tax consultants, mobile app development companies, janitorial services, so on), the street address of your business, the  days and number of hours your company/ business remains open, contact number and email, social media profile links and a link to the mobile-only version of your website.


Make sure that once the home page of your website loads in the browser the above information should appear in plain text. The advantages are several, but foremost, anyone would be able to see this crucial information while accessing your website irrespective of the device they’re viewing on.

Step 3 – Select a Mobile Website Theme

Start with selecting a mobile website theme. If your website is built on a WordPress platform there are several awesome mobile website themes available, both free and paid. Select the one that suits your business niche and represents your trade perfectly. You can also take help of free and inexpensive mobile website creator tools. Conduct an online search; you’ll have more than a handful to try out.
  • Must Read: 

Step 4 – Get a Custom URL for your Mobile Website

Do you know that mobile versions of a website have a different URL structure? In case of mobile websites, usually the web addresses starts with “m” and most ends with “.mobi” and not “.com”. Although in most cases when someone accesses a website from a cell phone, that already has a mobile version in place, the mobile version loads as the default.
But, in some instances, the desktop version loads, leaving a bad impression on the mind of the mobile web surfer. So, to be doubly sure, keep a link of your mobile website on the home page of your website’s online version.
Apply these 4 steps and start making your business site more valuable and attractive to mobile website viewers.

4 Easy Steps to Start Building Your Mobile Website from Scratch

By Ehijoshua (Jboss) →

3 Methods To Disable Right Click On A WebPage – CSS, Javascript and HTML


There’s no doubt that since the inception of the internet, the fight against content theft has always been on the increase as content thieves are always on the rise.
how to disable right click
In this short tutorial, I’ll be guiding you through a set of ways you can easily disable right click on your website, blog or webpage using any of the methods below.
Before we continue, one thing you should bear in mind is that disabling right click can be useful in some websites and become useless for others. For instance, disabling right click on this blog
would do more harm than good as many people won’t be able to copy various codes I’ve given out here. So use this function wisely.
Below, you’ll learn how to disable right click using JavaScript, CSS and HTML body tag

Disabling Right Click Using HTML Body Tag

After you must have designed a webpage let’s say using DreamWeaver, it is very much easy to disable right click by means of adding oncontextmenu handler in body tag of webpage.
When you view the source code of your newly designed webpage, search for <body>, add the oncontextmenu handler to it as
<body oncontextmenu=”return false;” >
Then Save. It works like charm, your content would be more secured as right click would be disabled.

Disabling Right Click Using CSS

This is another pretty easy method you can use in disabling right click. One thing I like about this method is that people barely know that CSS can disable text selection and might not be able to find ways to outsmart this method unlike the Javascript method. Here we will be making use of the user-select CSS property to disable right click in any selected CSS class region of your choice. In this method, I’m assuming that the CSS region you wish to disable right click is specified as a body CSS class (.body). Below is the CSS snippet to add to your CSS code to disable right click.

.body {
-webkit-user-select: none;  /* Chrome all / Safari all */
-moz-user-select: none;     /* Firefox all */
-ms-user-select: none;      /* IE 10+ */
-o-user-select: none;
user-select: none;
}

Add it to your site’s CSS file and save. Right click would be disabled in the selected region.

Disabling Right Click Using Javascript

Using Javascript to disable right click is one of the widely used methods around the web. I actually don’t prefer this method as content thieves can easily outsmart this method by disablpng Javascript on their web browsers. Below is a link to a former tutorial I made on how to disable right click using JavaScript.
I hope you find this guide useful. Feel free to let us know any problems you encountered using the comment box below.

3 Methods To Disable Right Click On A WebPage – CSS, Javascript and HTML

By Ehijoshua (Jboss) →

6 Effective Ways To Promote Your Web Design Business

ways to promote a web design business
The internet has really proven to be a place for great money making opportunities in recent times and is the major reason why everyone wants to build a website for their business. Considering the fact that all businesses are going online, web-designers are really sort after for their services.
If you started a small webdesign business recently and looking for ways to promote your web design business to get more clients and make more money, here are 6 must know tips for your business promotion.

1. Create A Portfolio

If you intend providing web design services for clients, you surely know how important it is for you to have your portfolio website. A portfolio is were you show off the best jobs and designs you’ve done previously. One thing to bear in mind is that you should have your best jobs out there in your portfolio, and at least 5 screenshots of 5 jobs you’ve done.
Your portfolio has it’s way of convincing clients to do a job with you.

2. Start Designing Almost For Free

If you want to make a head way in this industry, you have to make sacrifices at the start. I’m not trying to encourage you doing free jobs, but you should start with a couple of free or cheap jobs so as to get referral clients. Those clients you did free jobs for would definitely let others know about your services and get you more jobs.
Considering the fact that you need a couple of websites in your portfolio, starting up with free designs would get you websites for your portfolio.

3. Link Back To Your Portfolio Site

On every website you design, make it a habit to link back to your portfolio website. For instance, placing a link from the clients website footer with an anchor text such as “Designed by [Your Company]” . This has proven to be an effective way to get referral clients especially if your design is great.

4. Advertise

The efficacy of advertisement can never be over emphasized. There are a whole number of ways to advertise your webdesign business to reach out to a new audience some of which include;
  • Advertising on social media sites such as Facebook.
  • Make use of Google Adwords to advertise on Google search results.
  • Advertising on blogs that are related to the Web Design niche as you’ll be able to get new clients from this.
  • Advertise your webdesign business Offline with mediums such as the TV Stations, Radio,Newspapers and wherever you find yourself.

5. Don’t Neglect SEO

Search engine traffic is one free traffic source that usually turns out to build a huge client base for firms when SEO (Search Engine Optimization) is done properly.
You can learn the basics of Off and On Page SEO, it’ll help you rank your portfolio website for terms such as “Webdesign Services” and more related terms.

6. Start A Blog

Blogging is another method to attract your target audience and clients to your website (business website). I remember I wrote an article sometime about how important a business needs to start a blog. You can read more from the link below.

Your Turn

Having read through this blog post, the best thing you need do is start implementing the tips outlined here and start making more money designing websites.
Feel free to leave your questions and contributions using the comment box below.

6 Effective Ways To Promote Your Web Design Business

By Ehijoshua (Jboss) →

New: Updated List Of All Spectranet Data Bundle 4G LTE Plans

We had actually written a post where we listed out all spectranet data plans, but today when I was about renewing my data using Quickteller, it was unsuccessful and therefore made me take a stroll to one of their offices here in Abuja.
spectranet data plans and pricesOn getting to the place, I was welcomed with a new price plan list and guess what, the new spectranet plans are really cheap compared to their former plans and other service providers in Nigeria.
Enough of the whole talks. Below is a complete updated list of all Spectranet 4G LTE Data Plans made available here in Nigeria

Spectranet Night Plans

The night plans are quite affordable and great for people who are willing to sacrifice their nights for cheap internet surfing.
Plan NameTimeDL SpeedValidity Data Volume Price 
Knight 5000*6pm to 8amUp to 2MBps30 Days20GBN5000
Knight 7000*6pm to 8amUp to 2MBps30 Days40GBN7000
Knight 9500*5pm to 9amUp to 2MBps30 Days55GBN9500
Knight Cine 5000*10pm to 8amUp to 2MBps30 Days40GBN5000
Knight Cine 6000*10pm to 8amUp to 2MBps30 Days50GBN6500
NOTE: The Spectranet LTE Nite Plans work 24×7 during weekends and other public holidays.

LTE 24×7 Plans

These are basic plans you might want to consider for your personal use. They work 24×7 all through the month.
Plan NameTimeDL SpeedValidity Data Volume Price 
Excess Neo 500024×7Up to 2MBps30 Days5GBN5000
Excess Value 700024×7Up to 2MBps30 Days10GBN7000
Excess Value 850024×7Up to 2MBps30 Days20GBN8500
Excess Value 950024×7Up to 2MBps30 Days25GB9500
Excess Smart 1450024×7Up to 2MBps30 Days40GBN14500
Excess Smart 1750024×7Up to 2MBps30 Days50GBN17500
Excess Smart 2350024×7Up to 2MBps30 Days70GBN23500

LTE Business Plans

I guess this would serve mini firms who make use of the internet.
Plan NameTimeDL SpeedValidity Data Volume Price 
Excess Premium24×7Up to 2MBps30 Days120GBN54000

Spectranet Top Up

There can be situations where you use up your data plan before the validity period comes to an end, never worry as spectranet makes it easy to top up your data bundle for N1000 only.
Plan NameValidity Data Volume Price 
Easy Top-UpTill Expiry Date Of Your Primary Plan1GBN1000
These are the best data bundle plans around as compared to our major telecom networks in Nigeria. I really enjoyed my day out at their office.

New: Updated List Of All Spectranet Data Bundle 4G LTE Plans

By Ehijoshua (Jboss) →

HOW TO USE YOUR PHOTO AS BACKGROUND ON 2GO


The Above Snapshot Is The One I Shot Using My Babe's Pix as THE Background...

This Tutorial Will Teach U How To Use Ur Own Babe's Photo, Ur Photo, Or Any other photo As The Background Photo... 

But Before I go On, I'll Luv to gv Credits To Whosoever Discovered This... 

Now, Lets Ride On... 
Firstly, Download This 2go Which Makes The Background Photo Feature Posible 

2go with Background.zip Or
2go With Background.jar


Now after you have downloaded the App open it and press option then press General settings =>


Den you will see a box titled Background path. Under it you will see something like FILE://E://Images/420177 as in the Snapshot Below but You May See Another Thing in The App If U Download It. 


Now, To Put Your Photo As The Background Photo, Lets Take For Example You Saved The Photo You Want To Use as "My photo.jpg" and It Is Stored In "Images" In Your Memory Card Change The Stuffs in the Box Above to FILE://E://Images/My photo.jpg

The Press Option, and Save


Note:

1. For phones like nokia c1,c2, nokia 3310c and other dont use any image that has more than 60kb memory nd the resolution must not be more than 360*360.
now open your 2go then press the green key to take a screenshot then upload it as your profile picture and see how your friends will be asking you questions that how did you do it.

>> The screenshot is stored in a folder named JIE inside the folder is where you are going to see the screenshot pictures. I hope this tutorial helps?

If It works 4u, dnt 4get to Comment Here.

HOW TO USE YOUR PHOTO AS BACKGROUND ON 2GO

By Ehijoshua (Jboss) →

How to Automatically Tweet When You Publish a New Post in WordPress

ThemeLab - Premium WordPress Themes
How to Automatically Tweet When You Publish a New Post in WordPress
Twitter is one of the best tools to let your followers know whenever you publish a new post in WordPress. If you have an active Twitter following, then you may want to automatically send tweets from your WordPress site whenever you publish a new post. In this article we will show you how to automatically send a tweet when you update or publish a new post in WordPress.
First thing you need to do is install and activate WP to Twitter plugin. After activating the plugin, go to Settings » WP to Twitter to configure plugin settings.
WP to Twitter settings screen

Creating a Twitter App for Your WordPress Site

To make use of Twitter API, Twitter now requires authentication using OAuth protocol. In order to use this plugin, you would need to create a Twitter App for your website. Go to Twitter Apps Registration page and sign in with your Twitter account. Next click on Create New App button to register your app. On the next page, simply enter a name for your app, a little description, your website URL and then use the same URL as callback URL for the app.
Registering your Twitter App
Twitter will now create an app for you and will take you to your app page. Now you need to give this app read-write access to your Twitter account. To do that, simply click on the Settings tab, and scroll down to Application Type section. Under Access field choose Read and Write and update your Twitter app settings.
Next you need to go back to your Twitter app’s Details page. Scroll down to the bottom of the page and click on Create My Access Token button. Twitter will now generate your access token. Below your access token keys, it will also show you access level, make sure it is Read and Write.
At this time, you have all the keys you need to authenticate your site with Twitter. Copy your consumer key, consumer secret, access token, and access token secret keys and paste them in WP to Twitter settings. Once you do that, simply click on connect to Twitter to authenticate your site.

Setting up WP to Twitter

After authenticating your site with Twitter, the next step is to configure WP to Twitter settings for your tweets. On the plugin’s settings page, scroll down to Basic Settings section.
Configuring WP to Tweet settings
The first option under basic settings is to choose a URL shortening service provider if you use one. It will also show you options for each post type. If you are using custom post types, then those post types would appear here as well. By default, it will show posts, pages, and links. You can simply click the check-boxes for post types you want to tweet.
WP to Tweet can automatically send a tweet whenever a new post is published or updated. You can set your own tweet message for outgoing tweets. Once you are done with configuration, save your settings.
Basically this is all you need to set up automatic tweets for new posts in WordPress. However, the plugin comes with some advanced options which will allow you to use WordPress tags as hashtags for your tweets. You can also exclude categories from automatic tweeting, allow individual authors to send tweets, and enable Google Analytics tracking.
Advance settings for WP to Twitter
Under the Author Settings you can check the box next to ‘Authors have individual Twitter accounts’ which will allow other authors on your site to add their Twitter handles in their profiles. Under author settings you can also choose user roles which will have permission to add their twitter information, send tweets, or over-ride default tweet settings.
Allow authors to add twitter handles in their profiles

To Tweet or Not to Tweet?

Once you have setup WP to Twitter to automatically send tweets, you can still over ride these settings for individual posts on the post edit screen. You can choose to tweet or not to tweet a post, or even replace the default template with a custom tweet for the post.
Override default auto tweet with a custom tweet
The problem with automatic sharing and tweeting is that sometimes you may want to remove a post or change it. Sometimes you may even accidentally publish a post which was not ready for publishing. If you set up auto-tweet, then it’s too late for that. The word is out there with your tweet. To avoid this, we recommend scheduling WordPress posts for social media using BufferApp which would allow you to share on all your social media accounts when you publish a new post. You can also use Floating Social Bar and share your posts after publishing.
We hope this article helped you send automatic tweets when you publish new posts in WordPress. For feedback and questions, you can leave a comment or join us on Twitter or Google+.

How to Automatically Tweet When You Publish a New Post in WordPress

By Ehijoshua (Jboss) →