How to Automatically Tweet When You Publish a New Post in WordPress
Twitter is one of the best tools to let your followers know whenever you publish a new post in WordPress. If you have an active Twitter following, then you may want to automatically send tweets from your WordPress site whenever you publish a new post. In this article we will show you how to automatically send a tweet when you update or publish a new post in WordPress.
First thing you need to do is install and activate WP to Twitter plugin. After activating the plugin, go to Settings » WP to Twitter to configure plugin settings.
Twitter will now create an app for you and will take you to your app page. Now you need to give this app read-write access to your Twitter account. To do that, simply click on the Settings tab, and scroll down to Application Type section. Under Access field choose Read and Write and update your Twitter app settings.
Next you need to go back to your Twitter app’s Details page. Scroll down to the bottom of the page and click on Create My Access Token button. Twitter will now generate your access token. Below your access token keys, it will also show you access level, make sure it is Read and Write.
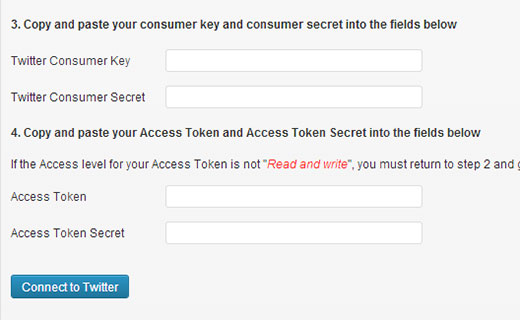
At this time, you have all the keys you need to authenticate your site with Twitter. Copy your consumer key, consumer secret, access token, and access token secret keys and paste them in WP to Twitter settings. Once you do that, simply click on connect to Twitter to authenticate your site.
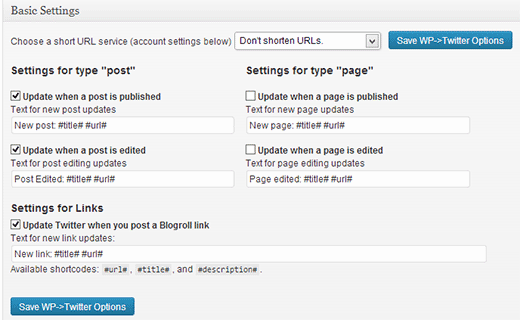
The first option under basic settings is to choose a URL shortening service provider if you use one. It will also show you options for each post type. If you are using custom post types, then those post types would appear here as well. By default, it will show posts, pages, and links. You can simply click the check-boxes for post types you want to tweet.
WP to Tweet can automatically send a tweet whenever a new post is published or updated. You can set your own tweet message for outgoing tweets. Once you are done with configuration, save your settings.
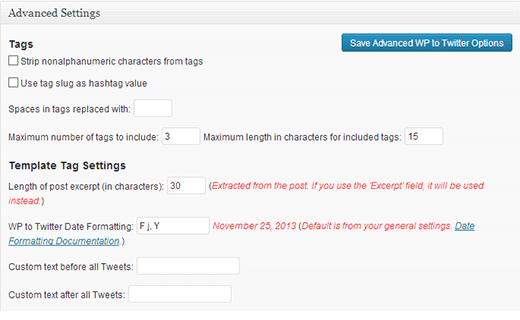
Basically this is all you need to set up automatic tweets for new posts in WordPress. However, the plugin comes with some advanced options which will allow you to use WordPress tags as hashtags for your tweets. You can also exclude categories from automatic tweeting, allow individual authors to send tweets, and enable Google Analytics tracking.
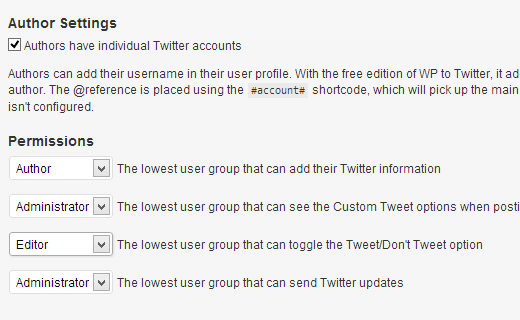
Under the Author Settings you can check the box next to ‘Authors have individual Twitter accounts’ which will allow other authors on your site to add their Twitter handles in their profiles. Under author settings you can also choose user roles which will have permission to add their twitter information, send tweets, or over-ride default tweet settings.
The problem with automatic sharing and tweeting is that sometimes you may want to remove a post or change it. Sometimes you may even accidentally publish a post which was not ready for publishing. If you set up auto-tweet, then it’s too late for that. The word is out there with your tweet. To avoid this, we recommend scheduling WordPress posts for social media using BufferApp which would allow you to share on all your social media accounts when you publish a new post. You can also use Floating Social Bar and share your posts after publishing.
We hope this article helped you send automatic tweets when you publish new posts in WordPress. For feedback and questions, you can leave a comment or join us on Twitter or Google+.
First thing you need to do is install and activate WP to Twitter plugin. After activating the plugin, go to Settings » WP to Twitter to configure plugin settings.

Creating a Twitter App for Your WordPress Site
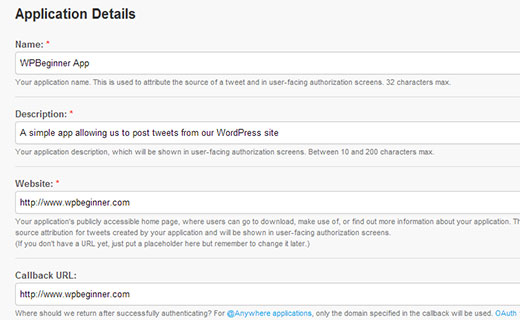
To make use of Twitter API, Twitter now requires authentication using OAuth protocol. In order to use this plugin, you would need to create a Twitter App for your website. Go to Twitter Apps Registration page and sign in with your Twitter account. Next click on Create New App button to register your app. On the next page, simply enter a name for your app, a little description, your website URL and then use the same URL as callback URL for the app.
Twitter will now create an app for you and will take you to your app page. Now you need to give this app read-write access to your Twitter account. To do that, simply click on the Settings tab, and scroll down to Application Type section. Under Access field choose Read and Write and update your Twitter app settings.
Next you need to go back to your Twitter app’s Details page. Scroll down to the bottom of the page and click on Create My Access Token button. Twitter will now generate your access token. Below your access token keys, it will also show you access level, make sure it is Read and Write.
At this time, you have all the keys you need to authenticate your site with Twitter. Copy your consumer key, consumer secret, access token, and access token secret keys and paste them in WP to Twitter settings. Once you do that, simply click on connect to Twitter to authenticate your site.
Setting up WP to Twitter
After authenticating your site with Twitter, the next step is to configure WP to Twitter settings for your tweets. On the plugin’s settings page, scroll down to Basic Settings section.
The first option under basic settings is to choose a URL shortening service provider if you use one. It will also show you options for each post type. If you are using custom post types, then those post types would appear here as well. By default, it will show posts, pages, and links. You can simply click the check-boxes for post types you want to tweet.
WP to Tweet can automatically send a tweet whenever a new post is published or updated. You can set your own tweet message for outgoing tweets. Once you are done with configuration, save your settings.
Basically this is all you need to set up automatic tweets for new posts in WordPress. However, the plugin comes with some advanced options which will allow you to use WordPress tags as hashtags for your tweets. You can also exclude categories from automatic tweeting, allow individual authors to send tweets, and enable Google Analytics tracking.

Under the Author Settings you can check the box next to ‘Authors have individual Twitter accounts’ which will allow other authors on your site to add their Twitter handles in their profiles. Under author settings you can also choose user roles which will have permission to add their twitter information, send tweets, or over-ride default tweet settings.

To Tweet or Not to Tweet?
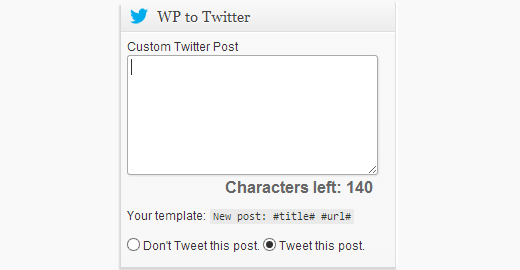
Once you have setup WP to Twitter to automatically send tweets, you can still over ride these settings for individual posts on the post edit screen. You can choose to tweet or not to tweet a post, or even replace the default template with a custom tweet for the post.
The problem with automatic sharing and tweeting is that sometimes you may want to remove a post or change it. Sometimes you may even accidentally publish a post which was not ready for publishing. If you set up auto-tweet, then it’s too late for that. The word is out there with your tweet. To avoid this, we recommend scheduling WordPress posts for social media using BufferApp which would allow you to share on all your social media accounts when you publish a new post. You can also use Floating Social Bar and share your posts after publishing.
We hope this article helped you send automatic tweets when you publish new posts in WordPress. For feedback and questions, you can leave a comment or join us on Twitter or Google+.


No Comment to " How to Automatically Tweet When You Publish a New Post in WordPress "